


Introduction
When I was young and idealistic, most electronics ran on vacuum tubes and a No. 2 pencil was my note writing tool of choice. Paper and pencil served me for decades and still works for field notes, but are less practical in the office. So here I sit, keyboard in hand, trying to wrap my gray matter around this thing called Obsidian. Can this old dog learn new tricks?
I have a drawer full of college‑ruled composition books that go back more years than some of you have been alive. They were my way of tracking things; reliable, portable, and offline. They are still useful in the field, when a computer isn’t practical. But at some point I must return to the office, where a more computer‑centric workflow exists.
I have tried Obsidian in the past, and remain skeptical about it’s usefulness. But I am giving it another try because the other solutions I tried (OneNote, Evernote, and Joplin come to mind) were basically worse for me either.
This time around I will be focusing more on the technical aspects, rather than work flow. I have noticed that some tutorials technical information is presented in terms of author workflow, which usually does not match mine. When workflow differs, methodology can become a stumbling block.
This write up shares my experiences, and will contain some of my work flow. I suggest paying attention to the technical details, but adept them to your work flow.
Quick disclaimers: It has been years since I have used either Windows or Mac, which makes me somewhat biased. It should not affect Obsidian usage, but will color my views on things like installation.
Short Overview of Obsidian
Obsidian is a relatively new application, developed during the COVID-19 pandemic, and release in early 2020. While it began as a straightforward note-taking application, additional capabilities have been added over the years, expanding its functionality significantly.
- Obsidian operates around the concept of vaults. A vault is simply a folder containing markdown documents and configuration files.
- Markdown is a lightweight formatting language developed in 2004 that’s easily stored in plain text files.
- In Obsidian, these markdown documents can also reference Cascading Style Sheets (CSS) for customization. The same CSS used for web pages.
- Obsidian vaults also contains a hidden folder with various configuration files stored in both CSS and JSON formats.
- JSON (JavaScript Object Notation) is an open standard released in 2013 that stores data in a human-readable format.
Obsidian’s growing functionality is aided by plugins. A plugin basically adds new features and capabilities. There are two types: Core Plugins (part of Obsidian itself) and Community Plugins (developed by Obsidian users). Community plugins are not official, and may occasionally break when Obsidian is updated.
One of Obsidian’s key advantages is portability of data. Your data is stored in plain text files. Markdown has fairly wide acceptance in other applications, so you’re in no danger of losing your data even if Obsidian disappears.
Installing Obsidian
Getting and installing Obsidian is dependent on your Operating system. From what I have reviewed, the Obsidian Website has instructions for installing on Mac and on Windows. The instructions for both Operating Systems can be summarized as;
- Download the installer
- Run the Installer, checking each question carefully to make sure they meet your needs (I don’t recommend just blindly using the defaults)
- On Windows find Obsidian in your Start Menu and click it to run
- On MAC drag Obsidian to your application folder and click on it to run it
For Linux there are four choices on the Obsidian website; AppImage, Snap, Flatpak, and Advanced Package Manager (apt, any Debian based distribution should support it).
Three of the four options on the website are basic sand-boxed installations that should work on almost any Linux distribution (AppImage, Snap, Flatpak). There may however be a few issues with sand-boxed applications;
- They take up considerably more space on your drive as they carry all their dependencies internally, reducing reliance on the underlying Operating System. This tends to only be a problem on systems with low amounts of storage
- They can be slower to open because of the added sandbox layer. On most modern hardware this is minimal, but may be a factor to consider on older hardware.
- They tend to not follow desktop themes, as they contain their own themes as well as dependencies. How much of a problem this is will depend on how the end user feels about some elements not matching their desktop theme exactly.
- Depending on how they are setup and installed, they may have issues interacting with the rest of your system. Sand-boxed applications have their own work space separate from the Operating System. Sometimes paths and networking can be issues.
This does not mean they are bad, just different. My suggestion, try them and see which works for you. For my installation I am installing from the KDE Discover package Store. This is a graphical application. Open it from your start menu, type Obsidian into search, and click on it to install. Fedora (the distribution I am currently using) uses the Flatpak version of Obsidian.
First Time Running Obsidian
When starting Obsidian for the first time, you will open a version of the “Manage Vault” window. I say version because there will be no right hand list of existing vaults, and there will be a “Quick Start” button right below the the Obsidian Version number.
I prefer not to use the “Quick Start” Button, because it does the same thing as the “Create New Vault” Button, with the exception of not letting you chose where to place your vault.
The “Manage Vaults” window has three basic options;
- Create New Vault: This creates a new vault at the location you pick. Note the name of the vault will be a folder inside that location.
- Open Vault from Obsidian Sync: requires a Obsidian Account, which I do not have. So I will not be using this option.
- Open Folder as Vault: allows you to open an already existing folder as a vault. If it is not an existing Vault, then Obsidian will add some hidden files to make it a vault. If it is a Vault, and Obsidian can find its hidden files, it will add it.
In this case I am going to Create New Vault. This will open a selector window where I can give the vault a name, and location. Note that whatever folder you select, Obsidian will create a new folder within it with your vault name.
Once this is done, you will be dropped into Obsidian’s main window.
The Obsidian Desktop
One of my initial difficulties using Obsidian was simple navigation. I would try a tutorial, and in many cases stare at the Obsidian desktop and think “huh?” So I want to identify the major parts of the Obsidian Desktop.
The window that opens once you have identified your vault is the Obsidian desktop. That big area in the center is your work area. However there are quite a few items surrounding that work area, some of which you will be using on a regular basis.
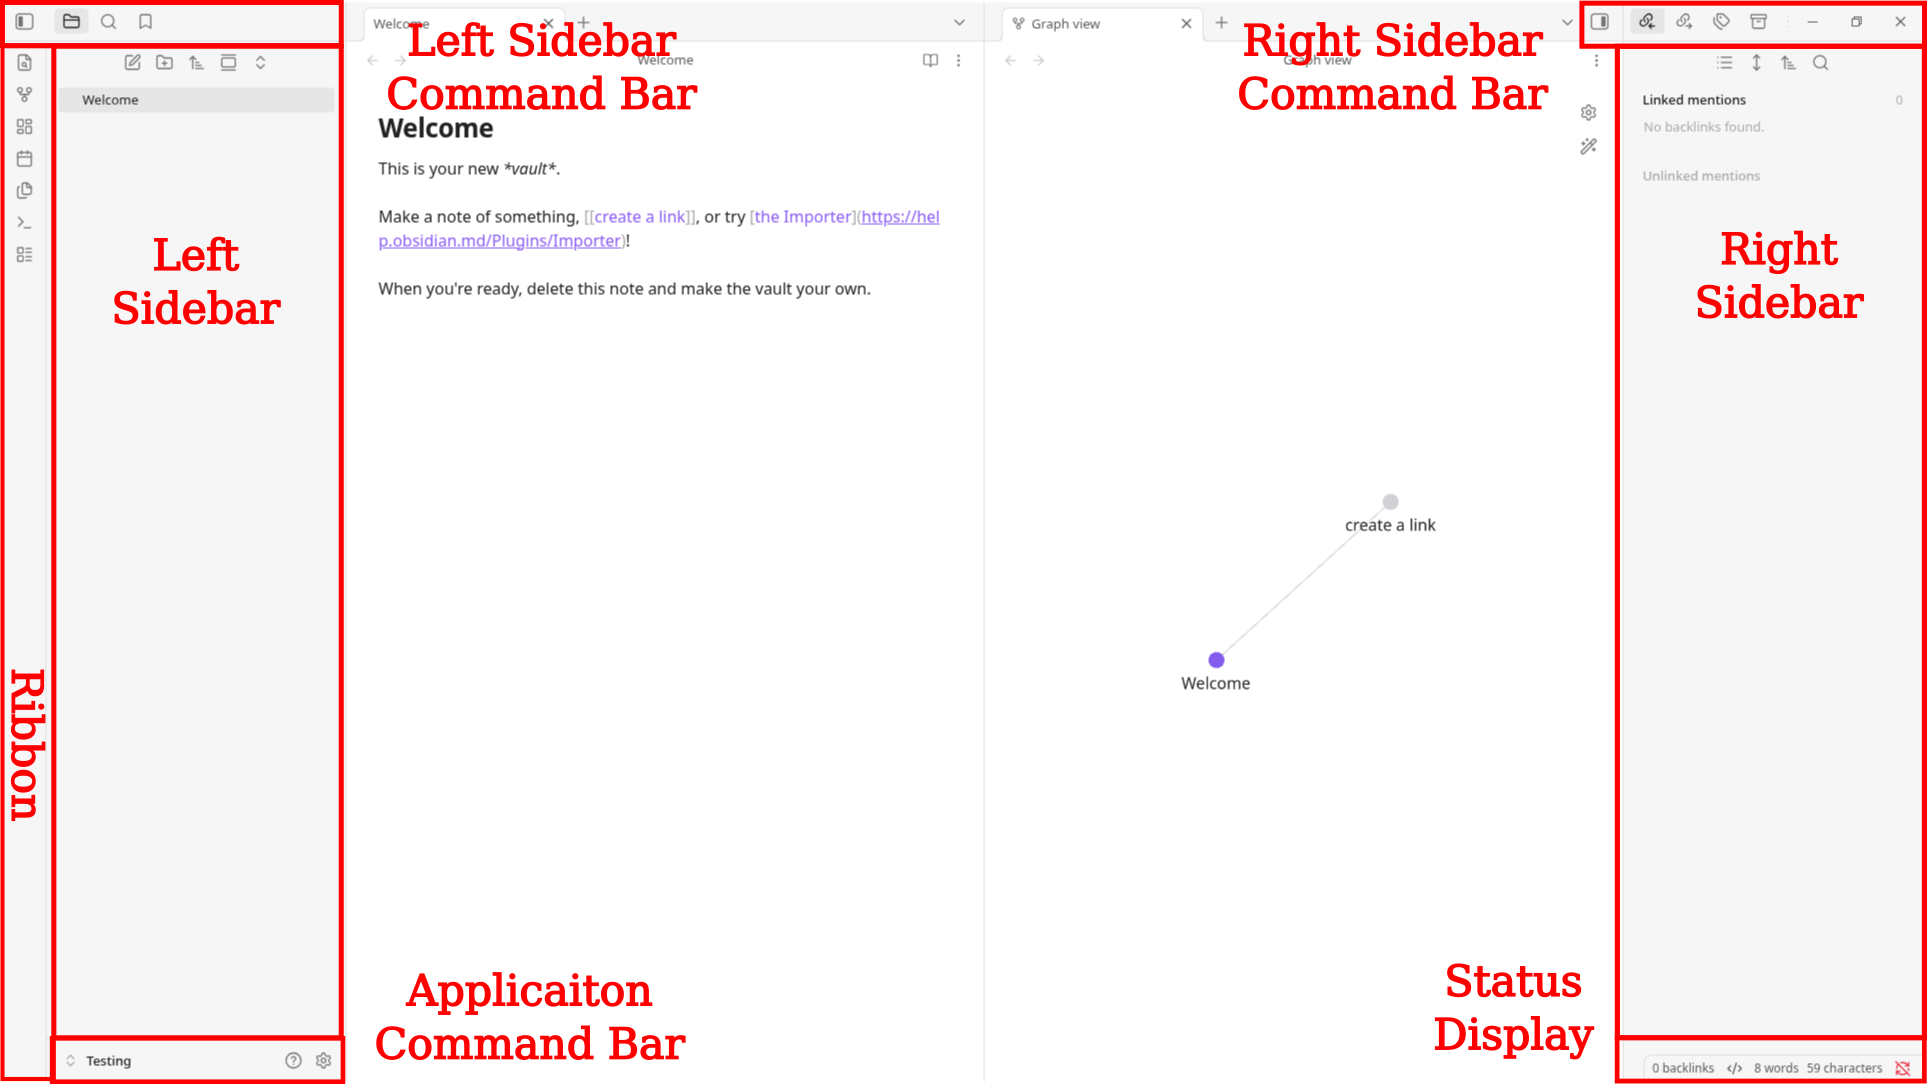
- Left sidebar: typically shows vault‑level information (file explorer, search, tags), depending on setup and plugins.
- Right sidebar: typically shows note‑level information (back-links, outline), depending on configuration.
- Ribbon (left of the left sidebar): quick access to features and plugins (e.g., graph view, daily notes, templates).
- Application command bar (bottom of left sidebar): access settings, help, and manage multiple vaults.
- Left sidebar command bar (top of left sidebar): controls what the left sidebar displays; an icon lets you collapse/expand it.
- Right sidebar command bar (top of right sidebar): controls the right sidebar display and provides a collapse/expand icon; window close/maximize/minimize buttons appear nearby but aren’t technically part of the sidebar controls.
- Status bar (bottom of the window): displays informational items about your vault depending on configuration.
Crazy Starting Setup
Previously, my Obsidian desktop had felt cluttered, with many buttons and icons whose functions were not clear. Since this is a fresh test vault with nothing important, I’ll start by disabling every plugin to see what remains. Then I’ll enable only the core plugins I think I’ll need initially. I’ve tried disabling bits and pieces in other apps before without much improvement; this time I aim to clear the default desktop clutter by starting from zero and only adding back essential features.
Going to the application command bar, I select the gear icon to open settings. There initially seems to be a lot here. But I notice the lower list are all plugin settings. Removing these will leave only a few setup options. Things like Appearance, Hotkeys, and editor functions I can adjust later.
The first place I want to stop is the community plugins section. This is mainly to make sure it is turned off, and no community plugins are installed.
Next I jump to the core plugins tab. All active plugins are highlighted and their switch set to the right. I will just walk though the list and turn everything off.
As I turn things off, I notice items disappearing form the desktop, as well as the second part of the settings list.
Exiting back to the Obsidian desktop, I notice pretty much everything is gone. The only icons that are left are the ones to expand and collapse the right and left side bars.
I am officially at ground zero. Now to start adding things back.
Going through the list of core plugins, I initially turn on the following;
- Backlinks: this shows links form other files to a particular document. Since it is a document level plugin it should show up on the right.
- Files: is basically a in application file browser. Since it deals with the overall vault it should show up on the left side someplace.
- Outgoing links: these are links form a current documents to other documents, sort of the opposite of back links. Should show up on the right.
- Search: always a good function to have. Its domain is the entire vault so it should show up on the left.
- Word count: is informational, and not really needed. It should show up in the lower right corner.
Those are the major plugins I want to initially turn back on. There are a few others in the list I want to keep in mind as I think I might actually need them later. But I am not going there now.
Note Taking Function
First thing I want to do is switch between Edit and Read mode for the active displayed page. There is an icon in the upper right corner of the work area that will look like a open book or a pen, that shifts between Read and Edit mode.
Note that in Edit mode we only see markup when we are working with the specific text. Next to the Read/Edit icon are three vertical dots that open a context menu. From here you can check Source mode to turn it on. Now Edit mode will show all the markup all the time.
Next I want to click on the “create a link” link in the default Welcome page. This points to a non existent page. Clicking on it will create that page. This basically demonstrates I can place a link pointing to a non existent page and create it by clicking the link, which is much faster than creating a page then linking it.
Now I want to create a couple of tasks I am working on. One for ARLO (cameras no longer sync, and customer service is very poor).
The second task is my ongoing battle with YouTube and AdSense for monetization (another example of very poor customer service).
I also add a task tag to search by. These type of tags can go anywhere in the page, they do not have to be at the top. Tags look like a convenient way to sort notes as they can be searched on specifically, but I can also see getting carried away with them.
Now I create a folder to keep my tasks separate. Then drag and drop the two I created into the folder. Some people will object to using folders in Obsidian, and I can understand their reasoning. What if a note belongs in two separate folders? It is more efficient to add multiple tags, even though this can lead to a confusing file browser pane. My perspective so far, if a page has a specific function (like a task) it can go into a folder for that function, and tags can be used to link it to other categories.
Something I saw in several tutorials was creating one or more Map of Content (MOC) pages. They can be cascaded from general to specific and just contain links to other pages.
Since I have limited content, I can do an overall vault content page broken into sections. I use a “@” instead of something like “MOC-” to keep all such pages together at the top of the list in the File Browser. Adding a link is easy, just use the “[[]]” brackets and select from the drop down list that will appear.
So far so good but I will have to add lots more information to see how this holds up.
Whats in a Vault
Now that we have some content, lets take a look inside the vault. I want to make a point here about how information is stored, and is easily retrievable though a variety of means. I will also need to enable “show hidden files” to see all the content.
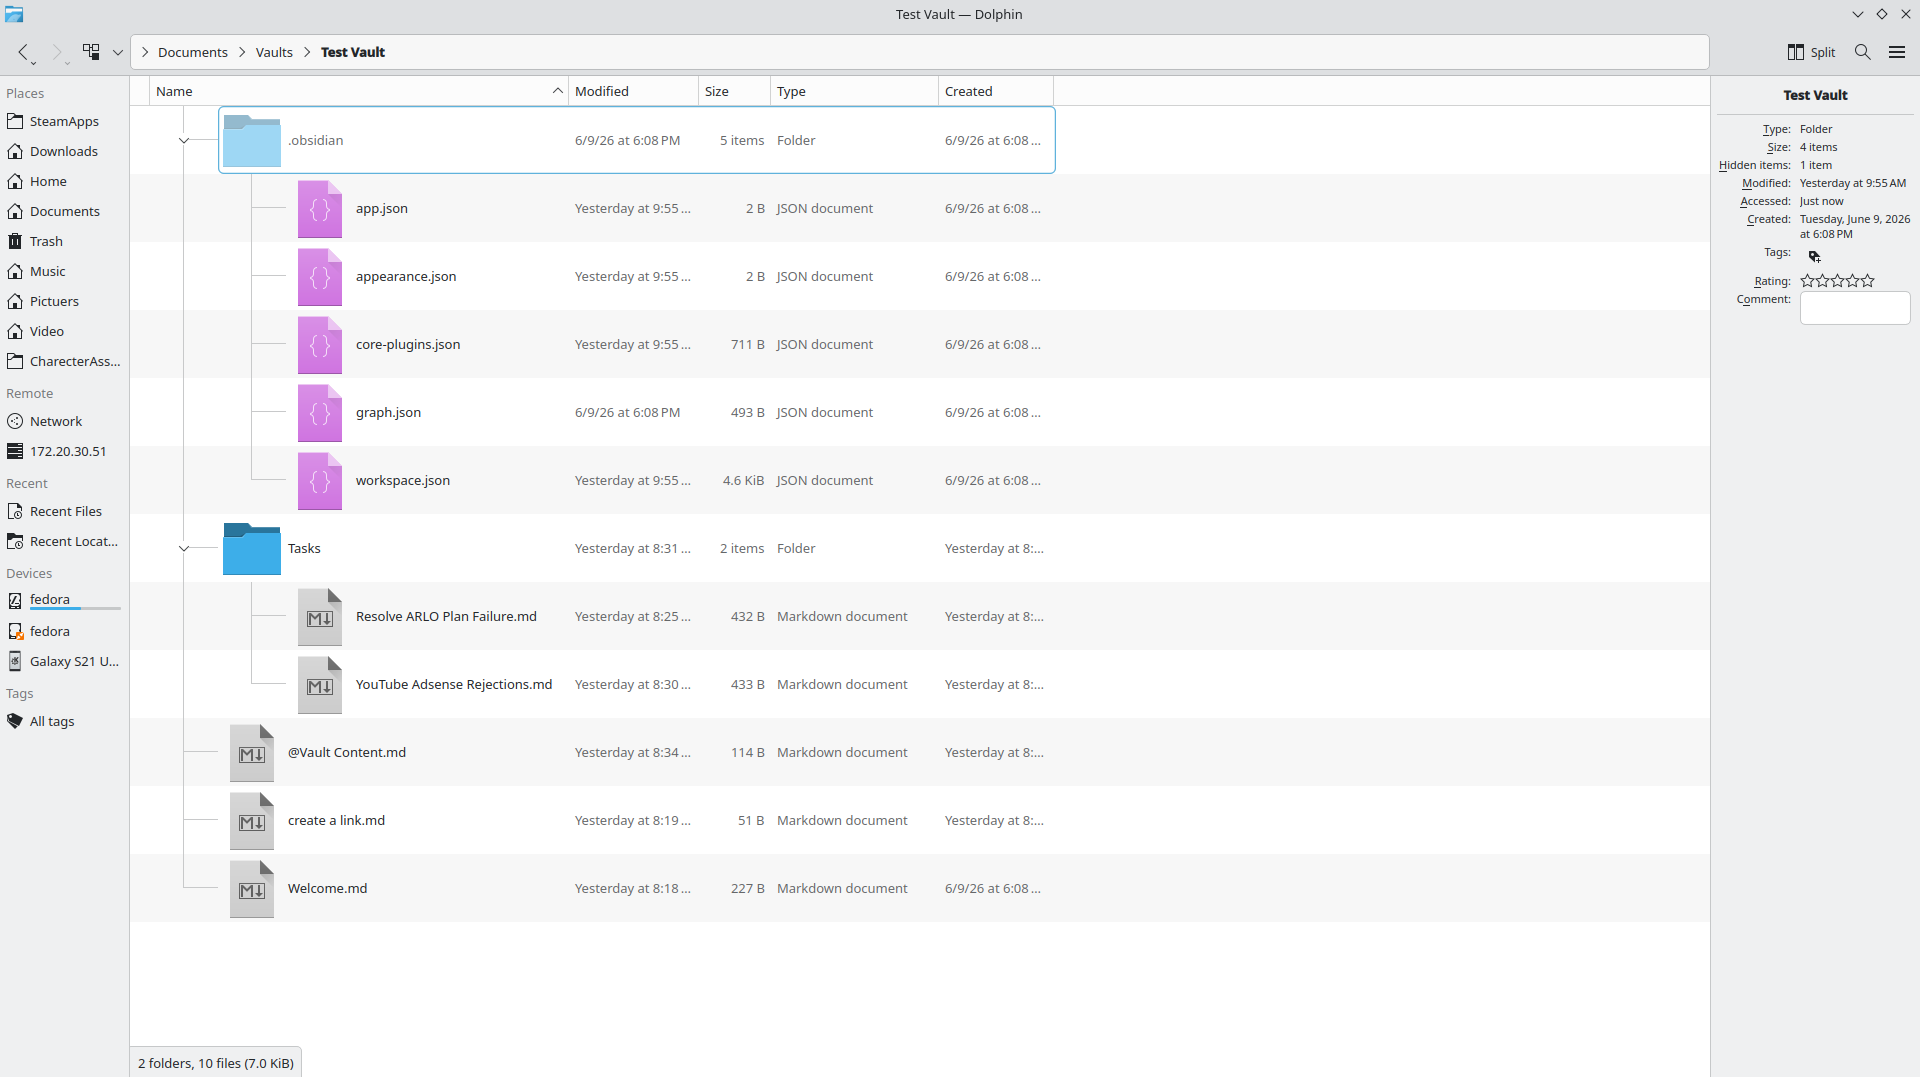
Once we make hidden files visible, we can see the “.obsidian” folder. This is where Obsidian hides its configuration informaiton. Currently it contains JSON files, but if we work with CSS snippets, it will also contain CSS files.
Note these files are all basic text only files and can be read in any text editor.
Outside of the hidden folder we have our actual vault content, in markup. Again these are simple text files (sensing a pattern here?) that can be read with any text editor.
And surprisingly that’s all there is to the Vault.
Conclusion
I have officially jumped back into Obsidian. And one of the things I am doing differently this time around is creating a test vault. My past experiences involved following a tutorial in my main vault, messing something up or getting confused, and eventually getting frustrated. This time around I will set things up in my test vault, experiment with them, and get a good feel for the technical aspects before trying to work a process into my main workflow.
I have started simple here with only a few active features. I will continue to work with them to develop a better understanding before trying to integrate them into an active production vault.
And through this process I am discovering what other plugins I actually need. For example, I want to do tasks, but I want them to be laid out uniformly. This implies a template of some sort.
And that raises the question what to put in such a template. I have noticed some task templates have way to much stuff, and others hardly any. Now I will admit there are varying complexities of tasks, so do I need two templates? A To Do list for simple tasks and a Project for more complex tasks? These are all decisions I need to make in my test vault before moving them to production.
Speaking of which, I think I will be hitting Templates in my next installment.
Leave a Reply