


Introduction
Over the past few days, I explored several tutorials for creating a launcher page for my home lab. From my novice perspective, many of the available options seemed unnecessarily complicated to install and use, especially for such a relatively simple purpose.
I found myself thinking, “It can’t be that complicated. Why not create my own?” As it turned out, the project was somewhat more complicated than I expected.
I no longer do much web development, and I realize that web technologies have changed considerably over the years. Based on my previous experience, however, I believed it should be possible to create a local dynamic webpage containing links to various network resources without requiring a web server.
As it turns out, it is possible—with a few caveats.
I did not want to hard-code the links directly into the webpage. Instead, I wanted the page to load them from a separate file. Unfortunately, modern web browsers handle local files differently than they did in the past. Browser security restrictions make it difficult for JavaScript to read local files without additional configuration or workarounds.
I will not describe every design change and compromise made during the project. To keep things as simple as possible, I will focus on the final design and the scripts used to make it work.
Basic Structure
As I researched the available options, the goals for the project gradually evolved. In the end, I decided to divide the work into several smaller projects.
Creating the webpage is the first step. Future versions may include a search function and the ability to add or remove entries directly from the webpage.
The goal of this first phase is to create a JavaScript program that generates the launcher-button section of the webpage from a data array. This also requires creating the basic HTML and CSS files used by the page.
The initial project consists of four files and a directory containing the graphics and other assets:
/Parent Directory
├── index.html
├── default.css
├── main.js
├── data.js
└── icons/
index.html provides the basic page structure, including the header, main content area, and footer. The main content area has an ID that main.js uses as the target for dynamically generated content.
default.css contains the visual styling for index.html, including the elements generated dynamically by main.js.
main.js generates the buttons and links displayed in the main content area. It imports and uses the data defined in data.js.
data.js contains a manually created array of categories and their associated links. main.js uses this data to generate the main section of the page.
The icons directory contains the graphics, logos, and backgrounds used by the page. Technically, not all of these files are icons. CSS will control the size and scaling of the graphics, allowing artwork with different dimensions to be used together.
HTML and CSS Framework
The HTML layout is probably the simplest part of this project. There is nothing particularly unusual or complicated, so I will focus on its high-level structure.
I begin with a DOCTYPE declaration, followed by general informational comments such as the version, last-updated date, and author. I recommend adding similar identifying comments to each document in the project.
The top-level html element specifies English as the document language. Within it, the document is divided into a head and a body. The head section defines the character encoding, page title, default CSS stylesheet, and JavaScript files.
Because main.js modifies elements in the document, I use the defer attribute. This allows the browser to parse the HTML before executing the script. I also load data.js before main.js, because main.js uses the array defined in data.js.
The body section contains several parts. The header and footer are static, displaying page title, logo, and other information. Technically the time display is not static, being a function of main.js. But it is also not as complex as the rest main section functions. The main section is generated completely by main.js with data from data.js. Technically, both scripts could be placed at the end of the body, but I prefer keeping external file references in the head.
The body contains a header, main content area, and footer. The header and footer are mostly static, displaying the page title, logo, and other information. The time display is generated by main.js, but it is simpler than the functions responsible for creating the launcher buttons.
The main element is defined in index.html, but its contents are generated by main.js using data from data.js.
The CSS is similarly straightforward. Some rules in default.css apply to content generated dynamically by main.js. I have organized the stylesheet to distinguish between static and dynamic elements, making it easier to edit and review.
During the initial build, I created all of the content statically. This made the CSS easier to test and evaluate. Once the general page structure was acceptable, I began transferring some of the static elements into JavaScript.
Java Script – Data.js
This project uses two JavaScript files. Because these files contain the most complex parts of the launcher, the remainder of this discussion will focus on them.
The data.js file contains the launcher data that I create and maintain manually. It is loaded before main.js because main.js reads this data when generating the webpage.
const launcherData = [
    {
        category: "Local Servers",
        entries: [
            {
                title: "Elysium",
                comment: "Proxmox VE Server",
                url: "https://172.20.30.41:8006",
                icon: "icons/ProxmoxIcon.png"
            },
            {
                title: "Asphodel",
                comment: "Proxmox VE Server",
                url: "https://172.20.30.32:8006",
                icon: "icons/ProxmoxIcon.png"
            }
        ]
    },
    {
        category: "Local Hardware",
        entries: [
            {
                title: "Gateway Router",
                comment: "Huawei EG8145V5",
                url: "http://172.20.30.1/",
                icon: "icons/Huawei.png"
            },
            {
                title: "AP Router LR",
                comment: "Netgear R7000",
                url: "http://172.20.30.2/",
                icon: "icons/NetGear.png"
            }
        ]
    }
]
The first line declares a constant named launcherData and assigns an array to it. The array uses two levels of organization.
The first level contains the category name (category:). The second level contains the entries associated with that category (entries:).
Each entry contains the information needed to create one launcher button: title , comment, url, and icon identifies the graphic displayed with the button.
The array can contain multiple categories, and each category can contain multiple entries.
The data is processed in the order in which it appears in the array. Categories are displayed from top to bottom, and entries appear in the same order in which they are listed within each category. Therefore, the array should be arranged to match the desired order on the webpage.
Java Script – main.js
Because main.js performs most of the page-generation work, it first obtains a reference to the main content element:
const launcherContent = document.getElementById("launcher-content");
This statement searches the document for the element with the ID launcher-content and stores a reference to it in the launcherContent constant. The reference can then be used to insert the launcher categories and buttons without repeatedly searching the document.
The script uses two primary functions: renderLauncher(), which generates the launcher content, and updateClock(), which displays the current time.
The updateClock() function creates a new Date object to obtain the current time. It is called once per 1000 milliseconds. It then uses toLocaleTimeString() to format that time as hours and minutes before placing the result in the HTML element with the ID clock.
function updateClock() {    // Set Clock Time
    const clock = document.getElementById("clock");
    const now = new Date();
    clock.textContent = now.toLocaleTimeString([], {
        hour: "2-digit",
        minute: "2-digit"
    });
}
The renderLauncher() function is somewhat more complex because it coordinates the creation of the launcher content.
It first removes any existing content from the main launcher section.
The function then uses forEach() to process each category in the launcherData array. For each category, it calls createCategory(). That function creates the category element and generates the launcher entries associated with it, by calling createLauncherEntry().
The element returned by createCategory() is stored in the category constant. It is then added to the page using appendChild():
function renderLauncher() {
    launcherContent.innerHTML = "";
    launcherData.forEach((categoryData) => {
        const category = createCategory(categoryData);
        launcherContent.appendChild(category);
    });
}
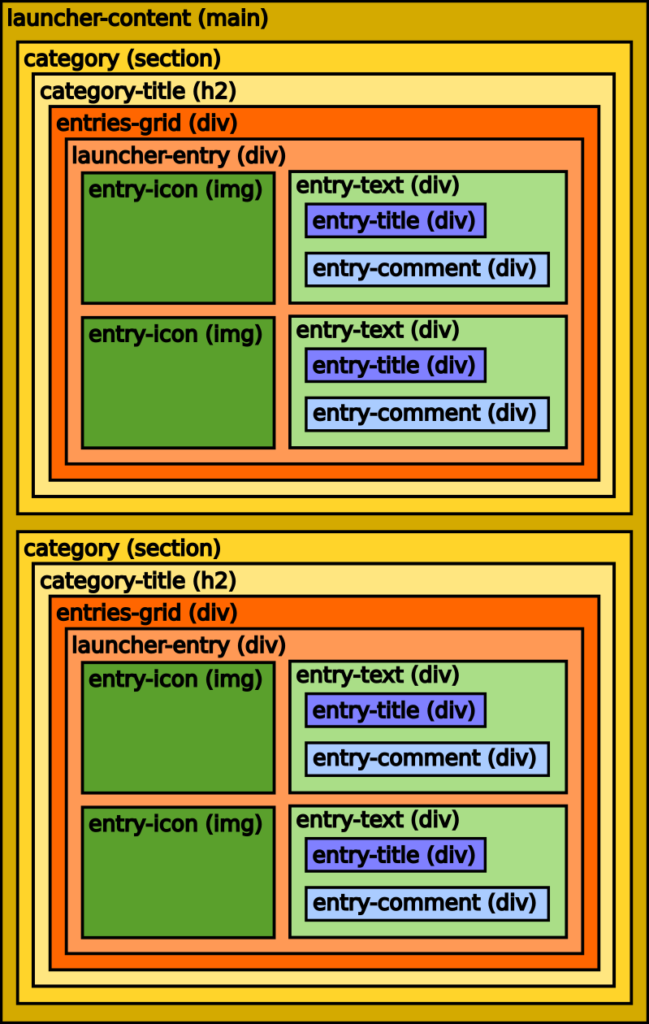
The createCategory() function creates the DOM elements needed for one launcher category. The completed category section is returned to renderLauncher(), which adds it to the webpage.
The function begins by creating a <section> element with document.createElement(). It then assigns the CSS class category to that element. This class allows the section to be styled by the stylesheet.
Next, the function creates an <h2> element for the category title. The category-title class is assigned to it, and its text is set using the category name stored in categoryData.
The function then creates a <div> element to contain the launcher entries. This element receives the entries-grid class, which allows CSS to control the layout of the launcher buttons.
Another forEach() loop processes the entries in categoryData.entries. For each entry, the function calls createLauncherEntry(). The returned element is stored in launcherEntry and appended to the entries grid.
Finally, the category title and entries grid are appended to the category section. The completed section is returned to renderLauncher().
The function builds the category from the inside out. First, it creates the individual elements. It then places the launcher entries inside the grid, and finally places the title and grid inside the category section.
function createCategory(categoryData) {
	const categorySection = document.createElement("section");
	categorySection.className = "category";
	const categoryTitle = document.createElement("h2");
	categoryTitle.className = "category-title";
	categoryTitle.textContent = categoryData.category;
	const entriesGrid = document.createElement("div");
	entriesGrid.className = "entries-grid";
	categoryData.entries.forEach((entry) => {
		const launcherEntry = createLauncherEntry(entry);
		entriesGrid.appendChild(launcherEntry);
	});
	categorySection.appendChild(categoryTitle);
	categorySection.appendChild(entriesGrid);
	return categorySection;
The final function is createLauncherEntry(). It receives one entry from a category and creates the launcher element that will be displayed on the webpage.
The function begins by creating an <a> element. This element serves as the clickable launcher button. Its CSS class and destination URL are assigned from the entry data.
The target attribute is set to _blank, which opens the destination in a new browser tab. The rel attribute is set to noopener noreferrer to provide additional security when opening another website.
The function then creates an <img> element for the entry icon. The image source, CSS class, and alternative text are assigned using information from the entry object.
An onerror handler is attached to the image to deal with missing or unavailable icons. If the icon cannot be loaded, the image is hidden and the missing-icon class is added to the launcher link. CSS can then adjust the launcher’s appearance when an icon is unavailable.
Next, the function creates a text container for the entry title and comment. These elements are added to the text container, along with the icon. The completed launcher link is then returned to createCategory().
function createLauncherEntry(entry) {
    const link = document.createElement("a");
    link.className = "launcher-entry";
    link.href = entry.url;
    link.target = "_blank";
    link.rel = "noopener noreferrer";
    const icon = document.createElement("img");
    icon.className = "entry-icon";
    icon.src = entry.icon;
    icon.alt = `${entry.title} icon`;
    icon.onerror = function () {
        this.style.display = "none";
        link.classList.add("missing-icon");
    };
    const textContainer = document.createElement("div");
    textContainer.className = "entry-text";

    const title = document.createElement("div");
    title.className = "entry-title";
    title.textContent = entry.title;
    const comment = document.createElement("div");
    comment.className = "entry-comment";
    comment.textContent = entry.comment;
    textContainer.appendChild(title);
    textContainer.appendChild(comment);
    link.appendChild(icon);
    link.appendChild(textContainer);
    return link;
}
Epilogue
That brings the first phase of the project to a close: four files and a functional home-lab launcher webpage. The project consists of two JavaScript files, one HTML file, and one CSS file.
I will place an archive of the completed files on retiredtechie.com for anyone who is interested.
Through this project, I expanded my knowledge of HTML, CSS, and JavaScript. Beyond the original project, I still have several related ideas I would like to explore, including adding search functionality and allowing entries to be added or modified directly from the webpage.
I have also been reading about CSS custom properties and the :root selector, so I plan to experiment with those next.
In the end, I found myself wondering whether the effort had been worthwhile. Essentially, I had converted a collection of bookmarks into a webpage containing icons and buttons. Although the result is more visually engaging than a traditional list of bookmarks, it does not provide any fundamentally new functionality.
Even so, the project gave me a greater appreciation for the complexity of the launchers I had examined. Although browser-based scripting has become more capable, the effort required to implement seemingly simple features has increased as well.
So why do it? To quote the great Alaskan bard Frank Walker, “The doing’s just for doing, and the reasons just because!”
Although the final product did not turn out exactly as I had originally envisioned, the experience of creating it was worthwhile in itself.
Leave a Reply