
Retired Techie
Getting older, not necessarily wiser!
JWM Agnostic X on Arch – Part 7
Published on November 13, 2022 at 7:15 pm by LEWIntroduction
In this post we are going to discuss the various elements that can go in the JWM tray. I will be adding some personal variations to the functions of some of the objects. Others that I will talk about, I don’t really use.
There are seven items in the current release of JWM that can go into the tray. We have already been introduced to a used a few of them. But we will discuss each item in a bit more detail in this post. I will be going through them alphabetically.
Clock
A digital clock can be put into the tray by using the <clock></clock> tags. The clock element uses strftime formatting for its display (go here for a quick reference to formatting) and tzset for the time zone. Default time display is %I:%M %p, and default time zone is whatever locale time is set on your computer.
Basic tag elements are format, zone, width, and height. Format and zone are touched on above. The width and height determine the size of the clock. If either is set to zero then the value will be calculated based on the tray.
In between the tags we can use exec to execute a program (like a calendar or day-planner app), showdesktop (which reduces all windows to the task list), or root:n (which will open the specified root menu.
The JWM configuration documentation talks about the “button” tag, but up to this point I have not tried using it, so I am unclear how its function might differ.
As usual the best way to understand is by example.
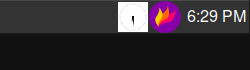
<Tray x=”0” y=”-1”>

    <clock format=”%I:%M %p %B %d, %Y” width=”230”>
        exec:xclock
    </Clock>

    <Clock format=”%I:%M %p Washington DC” zone=”EST5EDT” width=”200”>
    </Clock>

</Tray>
![]()
In this example we create a tray in the lower left corner of the screen with two clocks in it. The first one, by default, is set to local time (Philippines). The second clock uses the zone option to set the time to Eastern Standard. If you read much about tzset, you may find setting the time zone a bit confusing. To simplify, the zone setting I used came from this webpage.
Dock
What is referred to in the JWM documentation as a Dock, is more like a System Tray. This is a place where programs (like network managers, volume control, or screen shot utility to name a few) can place icons. There can only be one Dock per instance of JWM.
The Dock is dynamic, with size depending on the tray it is in and the number of items it shows. The Dock accepts two in line parameters; spacing (pixels between items in the Dock) and width (minimum width) of the Dock.
The <dock /> tag has no closing tag, and any options go within the tag itself. See the below example using the screen capture utility Flameshot.
<Tray x=”-1” y=”-1”>

    <Dock spacing=10” />

    <Clock format=”%l:%M %p></Clock>

</Tray>

Pager
The Pager displays a graphical representation of multiple virtual desktops. By default JWM comes configured for four virtual desktops.
![]()
Like the Dock, the pager has no closing tag. Its only parameter is Labeled, which writes the desktop labels on the graphical representation.
<Pager labeled=”true” />
The appearance of the pager can also be affected by the Desktops settings (something we will get to later). Basically in this example the virtual desktops are setup as a 4×1 grid. You could change this to a 2×2 grid, which wound then change the Pager display.
Spacer
The Spacer is just that, a way to insert space between the elements displayed in the tray. It is another single tag ending in a “/”. It has two settings, width and height (which both default to zero). If non zero, they set the size of the spacer in pixels. If zero, then a spacer will take up available space.
<Spacer width=”12” height=”0” />
Swallow
I have to admit this is one I do not normally use. What is meant by swallow is a miniature representation of the program appears in the tray. In the below example the xclock program is swallowed by the tray. It is a little small but still shows the correct time.
<Swallow width=”32” height=”32” name=”XClock”>

    xclock

</swallow>
The Swallow element has three options, height, width, and name. As usual setting height and width to 0 will calculate each option based on the tray it is in.
TaskList
This element basically displays running applications. You can click on an application in the task list to focus on its window. Note if there are multiple versions of the same application running, the task will display a number corresponding to how many instances are open. Repeat clicking will move you through the instances.
The TaskList is another single tag element.
<TaskList maxwidth=”256” />

The TaskList element has three options; maxwidth, labeled, and height. If not defined maxwidth defaults to 0 (no maximum width), labeled cab be true or false, but defaults to true, and displays the program name, height defaults to 0 or no preference, otherwise you assign the height of the TaskList.
TrayButton
The TrayButton is a set of tags, <TrayButton></TrayButton>. Between the tags you can execute (exec) a program, show the desktop, or open a root menu (root:n). A TrayButton can have a text label, an icon, and a popup.
If we look at the default tray configuration that was installed with JWM, there are a couple of examples of tray buttons.
<TrayButton label=”JWM”>root:1</TrayButton>
<TrayButton label=”_”>showdesktop</TrayButton>
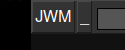
In the first example, the tray button is simply the letters “JWM, and it opens a root menu on a “1” event which is tied to a mouse left click (we will discuss assigning events latter). The other example is another text type tray button using “_” and it uses the showdesktop option.
The next two examples show using an icon (from earlier posts in this series icons names must be in defined icon paths).
<TrayButton icon=”JWM-blue”>root:0</TrayButton>
<TrayButton icon=”firefox”>exec:firefox</TrayButton>

In the first case we open a different root menu, tied to the 0 event. In the second case we use the exec: command to run a program (same command we would use in the terminal).
Conclusion
In this post we talked about what content can go in the JWM tray, and how to configure the items we place in the tray.
In the next post we will discuss some miscellaneous configuration topics, some of which we have touched on briefly already. There are several more generalized configurations to cover; Colors, Desktops, Fonts, mouse and key bindings, and other stuff. After that we will get into styling the various components.
JWM Agnostic X on Arch – Part 1 – The Install
JWM Agnostic X on Arch – Part 2 – Adding Some Applications
JWM Agnostic X on Arch – Part 3 – Initial Setup for Config File
JWM Agnostic X on Arch – Part 4 – StartupCommand and Group
JWM Agnostic X on Arch – Part 5 – Building a Menu Structure
JWM Agnostic X on Arch – Part 6 – Tray Attributes
JWM Agnostic X on Arch – Part 7 – Tray Content
JWM Agnostic X on Arch – Part 8 – Desktops, Bindings, Colors, and Fonts
JWM Agnostic X on Arch – Part 9 – Styling of Major Elements
Add New Comment