
Retired Techie
Getting older, not necessarily wiser!
Sierpinski Pyramid POVRay Part 4
Published on June 1, 2022 at 5:18 pm by LEWIntroduction
In this post we setup recursion for Sierpinski’s Pyramid. This is where the rubber meets the road. You may want to review the previous post in this series to see where we are and where we came from.
I will attache my POVRay Script File at the bottom of this post for those who are interested. It was written with POV RAY version 3.7.
I will walk through the various parts of the scene file in this post. Please note that my way of writing scene files may not jive with how you like to do it. There are many ways to arrive at the same goal.
Also note that there is nothing new or unique here. We all sit on the shoulders of those who came before.
Without any more pontificating, lets get to it.
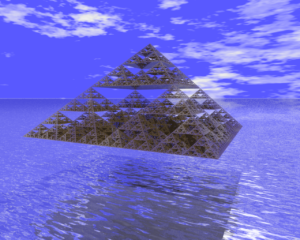
The Final Render
Just so we know what we are aiming for, here is a render I did from this scene file. It uses eight levels of recursion, and took about 15 seconds to render on my current computer.
In Scene Comments

Like any other type of script writing or programming, I always recommend using copious amounts of comments. That way when you look at it a few years form now, you will be able to figure out what you were doing and why.
Global Settings
Here is where we set up things like overall ambient lighting for a scene. You can review what is supported here.
You may also want to enter a POV Ray version value here so the program can make parameter adjustments if required.
Variable Declarations
I generally lump all my variable declarations together close to the top of the scene file.
In this case I am declaring the pyramid structure, scaling value, recursion value, and location value.
Macro Functions
I have declared my macro function next, though some might wish to declare these type of things at the end of a scene file. This is where the meat of the automation takes place.
I am having this macro call itself. When this happens, POV Ray keeps track of the status of the calling macro, as well as the called one.
Using an If – Then – Else statement, I list my five formulas in the if clause, and my pyramid object in the else clause. Each macro call calculates the placement and size of a pyramid, and reduces the recursion level by one.
Once recursion level reaches zero, the “else” part actually draws the pyramid. Once this happens, the program jumps back up a level (remember POV Ray remembers macro calls), and resolves another pyramid placement. Once all pyramid placements have been calculated, the macro exits, and the scene is rendered.
Cameras and Lights
I define scene objects like cameras and lights together. In this case I am using one camera and three light sources. I am not doing anything special, but there are lots of options for both cameras and lights you may want to look at.
Fixed Scene Elements
This is where I define various elements that make up a scene but are not the focus of the scene. In this scene I use a sky sphere and a plane that looks like water to setup the overall scene background. See this post for more information.
Scene Objects
This is where I define the objects that make up the focus of the scene. In this case I am simply running the macro created earlier in the scene file.
Conclusion
That is it for Sierpinski’s Pyramid. I would suggest downloading the scene file, opening it in a text editor, and reviewing the content. Then make your own modifications and render it in POV-Ray, Learn by doing!
Sierpinski Pyramid POVRay Part 1
Sierpinski Pyramid POVRay Part 2
Sierpinski Pyramid POVRay Part 3
Sierpinski Pyramid POVRay Part 4
SierpinskiPyramidV4 Scene Script
Add New Comment