Retired Techie
Getting older, not necessarily wiser!
ZFS File System – Heading for the Weeds
Published on May 16, 2022 at 8:09 pm by LEWIntroduction
In a previous post, I discussed a high level look at the ZFS file system. In this post I want to take a closer look at actually using ZFS, and where you might want to use it.
One thing I am not going to cover here is using ZFS as your root file system. Implementing ZFS as the root file system can get somewhat complicated pretty quickly, depending on your Operating System. Our discussion here will be limited to creating ZFS mirrored file systems for storage.
Also, I am going to stay away form some of the more complex configuration and other things you can do with ZFS. The focus here is setting up some data storage.
Boring Theory Section
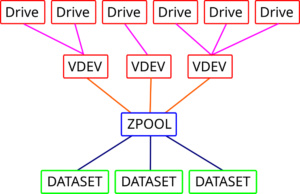
ZFS is a combination Volume manager and File System. The below diagram represents the infrastructure of ZFS.

At the top are the actual physical Drives. These can be any type of storage device. The Drives are grouped into the VDEV. Each VDEV has its own configuration. The table below shows some of the various configurations that are possible.
|
Stripe |
Mirror |
RAIDZ |
RAIDZ2 |
RAIDZ3 |
|
|---|---|---|---|---|---|
|
Number of disks |
1 |
2 |
3 |
4 |
5 |
|
Fault Tolerance |
None |
(N-1) disk |
1 disk |
2 disks |
3 disk |
|
Overhead |
None |
(N-1)/N |
1 disk |
2 disks |
3 disks |
Note that in RAIDZ or Mirror configuration storage is not the sum of all drives. In these two configurations some space will be used for redundancy. Mirror for example uses one drive to mirror the content of the other, so even though you have two drives, the available storage is equivalent of one drive.
A ZPOOL is made up of one or more VDEVs. The total storage is based on the individual storage of each VDEV. To access your storage you must set up a DATASET.
A DATASET is a file system. You can have several DATASETS within your ZPOOL, each mounted to a different spot.
A Two Disk MIRROR
For my working example I will set up a Fault tolerant two disk MIRROR, which is similar to RAID1 (Standard Raid Levels). In this type of setup, data is written to both disks, and each of the two disks is identical. If one of the disks fails, the other disk still contains all the data and will continue to function.
In this example I will attempt to install ZFS on Debian Bullseye. We will need to add the zfsutils-linux package to work with a ZFS file system. This is part of the contirb repository.
Many of the instructional tutorials that I have read use the back-port repository. But since this is a new ZFS install, and looking at the versioning, I don’t think it is necessary with bullseye. If I had an existing ZFS file system, then I suspect I would need the back-port. We shall see what happens.
Also I will be using partitions instead of entire disks for this exercise. As the computer I am installing on has only one internal drive, and this is just proof of concept.
The Setup
This process has been carried out on a new minimal Debian installation (see this post). It is GPT with one partition for root. I have created two additional partitions which are currently unused.
- First you need to become root. I use the su -l root command to do this.
- Modify the /etc/apt/sources.list file, and add “contrib” to the end of each line starting with a “deb”. Depending on what you may want to do in the future, you could also add “non-free”. Below is an example of one such line. Yours will differ depending on your repository and version.
deb http://deb.debian.org/debian/ bullseye main contrib non-free - Next run the commands apt update, and apt upgrade.
- Now run the command apt installl zfsutil-linux to install the ZFS utilities. You will get a warning about incomparable open source licensees (I get a chuckle out of that). Unlike other program installs, because of the open source license issue, this package will be compiled during install. Be patient.
- Now I check the ZFS version with modinf zfs | grep version. The version I have installed is 2.0.3-9.
- Now we have a question to answer. How do we want to identify our drives? We can use device names, like sda4 and sda5, as found in the /dev folder. However a lot of tutorials suggest using other methods, as in theory these designations could change if you have multiple drives (I have not seen it, but I understand the detection process so I understand their argument). If you look in dev/disks, you will see several other methods of identifying your drives. These other identifiers give unique, if somewhat long, names. Since this is a test, and I only have one drive, I am going with /dev/sda4 and /dev/sda5.
- I issue the following command, which completes sucesfully.
zpool create testpool mirror /dev/sda4 /dev/sda5What this has done is create a ZPOOL and mount it at the root level, /testpool. Additionally, it has created a VDEV called mirror-0 that consists of /dev/sda4 and /dev/sda5. ZFS will automatically mount this file system at reboot.
- Run the command zpool status, and you will see the information for testpool displayed, which also shows mirror-0. You can also issue the command zpool list to see the overall status.
Conclusion
In this post we have looked at creating a simple ZFS mirrored file system under Debian. I have endeavored to explain the various levels of a ZFS file system with an example. There is plenty more that can be done with ZFS. We have just scratched the surface here.

Add New Comment