Retired Techie
Getting older, not necessarily wiser!
Height Map Gimp and POV-Ray
Published on January 2, 2022 at 7:43 am by LEWIntroduction
A heightmap as used here refers to a graduated colored bitmap that represents terrain height. This sort of file is usable in creating land masses in some 3D graphics programs. In this example, I will be creating a random island like landmass. I will be using Gimp version 2.10 to create the actual image, then importing it into a POV-Ray version 3.7 scene script.
This is not the only way to do this. There are many techniques, some more involved than others. The purpose of the technique in this example is to create a quick random height map with a minimum of fuss.
Technical Stuff
In this example we will create an eight bit gray scale 1000 x 1000 pixel image. The color black will represent a height of zero percent and the color white will represent a height of one hundred percent. The actual heights will be determined by scaling parameters in the rendering engine.
An eight bit gray scale image gives us 256 different height levels. This is more than adequate for the size of our image. Greater bit depths will yield substantially more graduations of the gray scale. For example a sixteen bit gray scale has 16, 777,216 steps between zero and one hundred percent. While it can make a smoother final product, that color graduation is beyond what most people can actually distinguish with their eyes.
Note if you are not using the specific versions I mentioned here, some steps might have different menu options of methods to accomplish. In that case you will need to do some interpretation of the technique based on what you are using
Making the Height Map
- Open up Gimp and create a new file (menu: File → New). In the “Create new Image” dialog make the image 1000 x 1000 pixels. Select the Advanced options and set the image to Gray Scale and 8 Bit Integer precision.
- Locate the Color Picker, set your foreground color to White and your background color to Black.
- Find the Gradient Tool. If it is not visible, right click on the Bucket Tool to find it. Set the gradient as FG to BG (RGB). Then set the shape to Shaped (angular).
- Select the Free Selection (or Lasso) Tool. Now draw the a random outline of an island. Make it look however you want. Just make sure to join the two ends so it forms one continues loop.
- Select the Gradient Tool and draw a line across your canvas. Once you set the start point and end point, your island shape should fill with a gradient going from black to white.
- There is a center point marker on the gradient line you can drag along the line to adjust the appearance of the fill.
- Once you are satisfied, select Export as (menu:File → Export As). Give your file a name, and use the “.png” extension on the file name. Chose a location and save the file. Note for ease of use I suggest putting the file in the same directory as your POV Scene File.
Rendering an Image with the Height Map
As stated, I will be using POV-Ray to render this height file. I will be using the Sky Sphere example from this post as the base scene file.
Copy the base scene file from Sky Sphere Example into your scene file and save (preferably to the same directory containing your height map.
To the end of the scene file, add the below text.
height_field {
    png "YourFileName.png"
    smooth
    pigment {
        gradient <0,1,0>
        color_map {
            [0.1 color rgb <1.0, 1.0, 0.0>]
            [0.2 color rgb <0.0, 1.0, 0.0>]
        }
    }
    translate <-0.5, -0.1, -0.5>
    scale <30.0, 2.0, 30.0>
}
Replace the “YourFileName” with your file name. Note if the height_map file is not in the same directory, you will need to add path information.
Remember the POV-Ray coordinate system (x, y, z). Where x is left and right, y is up and down, and z is forward and backward.
The gradient orients the island in the X, Z plane.
The color map goes from yellow to green. You can add more color steps or modify the colors used.
Use translate to move the island around.
Use scale to set the actual size and height of the island.
You may also want to move the camera for a better view. I used an initial location of <0, 5, -20> looking at <0, 0, 0>.
Don’t forget to add comments to your scene file, so you will know what you did latter.
Conclusion
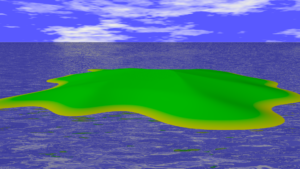
There you have it. We created a height map in Gimp, and used it in POV-Ray to make a small island. Obviously the island we made is fairly simplistic. It will need some additional work to make it look better.
But overall this technique is simple and painless to do. Play around with some of the parameters and settings to get a better feel for what you can do.


Add New Comment