
Retired Techie
Getting older, not necessarily wiser!
POV-Ray Base Scene File
Published on December 28, 2021 at 9:43 am by LEWIntroduction
In this post I will walk through one of my basic POV-Ray startup files. I find that having a few predefined starter scene files can really help me get a leg up on a rendering project.
I am assuming you did not land on this page by accident, so I will not be going into an overly detailed explanation about what POV-Ray is and what it does. I am also assuming that you have probably had some experience with POV-Ray through other tutorials, and sometimes find yourself struggling with writing a scene file.
I also am describing one of my starter scene files from my use perspective, and how I like to do things, which is almost certainly different from what you are doing. So please take what is written here as suggestions and not hard fast rules.
Why POV-Ray
POV-Ray stands for Persistence Of Vision Ray Tracer. It is a 3D ray tracing program in which you create scenes from text based script files. This makes it different from a lot of 3D ray tracing programs like Blender or Anim8tor, which have graphical interfaces/editors.
POV-Ray was originally developed for the Amiga computer (the late 1980’s where the fun times of personal computing), and is free and open source software. As of today, the program has been ported to most major Operating Systems.
POV-Ray can be a little tough to get your proverbial mental hands around. After all there are lots of other alternative programs with nice GUI interfaces that imn most cases many find easier to use. Because it is based on scripting, I find POV-Ray the preferred tool for representing complex esoteric ideas. For example, making a visual representations of mathematical function.
Using scripting also lends itself to creating snippets of scripts for various items that can easily be pasted into one another, which, once you have them, vastly speeds up the scene creation process.
POV-Ray Setup
In practice I mainly use POV-Ray on Linux, and sometimes on Windows. Which means those are the setups I will be covering.
There is an official scripting front end GUI available in Windows, that can be added during install. This can make getting started a bit easier. For Linux, there is no official front end. However there are several unofficial helper programs available.
On Windows I generally install POV-Ray with the front end option. I find this simplest and most straight forward in the Windows ecosystem.
For Linux I install POV-Ray from the distribution repository. The current version (version 3.7) in Debian 11 (Bullseye) is fairy current. However be aware that there is a beta 3.8 version, which if you chose to go that route would have to be installed outside the distribution repository system.
In my current Linux setup I use a vanilla text editor for scenes, and run POV-Ray from the command line. I have also written some bash scripts to both streamline and better control the rendering process. You could do the same thing in Windows if you wanted, as a dedicated text editor has a lot of features not present in the Windows front end. And BAT files are not difficult to write.
Writing bash scripts or BAT files is the subject for other posts. However for a very goods general purpose text editor, I recommend Kate.
A POV-Ray Scene File
This is one of my more simple POV-Ray starter scene files. I have added some additional in file comments that should explain most parts. You can technically delete all the in file notes and comments and the file will run just fine However, I strongly suggest adding comments to a file so you will know what you were doing when you open it five years latter.
/************************************************************
* Project
*
* Author:
*
* Version: Date:
*
* Description:
*
* I like to always keep some sort of tracking comments at the
* top of my scene file with some basic information about the
* file. I also like to add the version number to the file
* name when saving, so I don’t overwrite previous versions
* while I am working on a project. Never know when you will
* need one of them.
*
************************************************************/

/************************************************************
* Global Scene Settings
*
* These settings modify the entire scene in some manner.
************************************************************/

// Specifies the POV version of the Scene file to emulate

#version 3.7;

global_settings
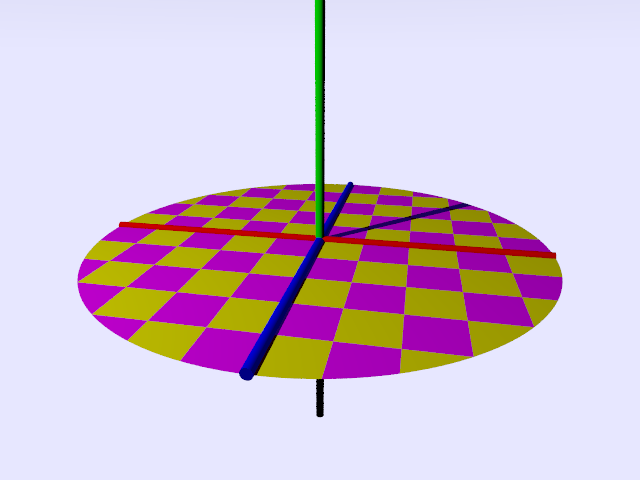
    // add ambient light of given intensity/color to Scene
    ambient_light rgb <0.1, 0,1, 0,1>

    //need gamma for POV-Ray version 3.7 and above
    assumed_gamma 1.0
}

// I prefer the sky sphere, rather than the background
// keyword, the sky sphere is more versatile. This version
// uses a color map to make a gradient background.

sky_sphere {
    pigment {
        gradient y
            color_map {
                [ 0.5 rgb <0.8, 0.8, 1.0> ]
                [ 1.0 rgb <0.2, 0.2, 0.4> ]
             }
         scale 2
         translate -1
    }
}

/************************************************************
* Local Objects
*
* These are the common objects needed in any scene.
************************************************************/

// Camera, nothing special in this basic version. Set position
// and where it is pointing.

camera {
    location <2, 4, -10>
    look_at <0, 0, 0>
}

// Light, nothing special in this basic version. Set position,
// color, and intensity.

light_source {
    <-7, 7, -7>
    rgb <1, 1, 1>
}

/************************************************************
* Temporary Objects
*
* These are place holders, so we have something to render.
************************************************************/

// Red tube in the plus/minus X direction.

cylinder {
    <-5, 0, 0>,
    <5, 0, 0>,
    0.1
    texture {
        pigment {
            rgb <1, 0, 0>
        }
    }
}

// Green tube in the plus/minus Y direction.

cylinder {
    <0, -5, 0>,
    <0, 5, 0>,
    0.1
    texture {
        pigment {
            rgb <0, 1, 0>
        }
    }
}

// Blue tube in the plus/minus Z direction.

cylinder {
    <0, 0, -5>,
    <0, 0, 5>,
    0.1
    texture {
        pigment {
            rgb <0, 0, 1>
        }
    }
}

// Disc with 1 unit checker pattern, Y normal

disc {
    <0,0,0>,
    <0,1,0>,
    5
    texture {
        pigment {
            checker rgb <1, 0, 1>, <1, 1, 0>
        }
    }
}
Conclusion
The above base file should be cut and paste addable to a POV Scene file to create a simple render. It is my starting point for my basic projects.
This design is incredible! You definitely know how to
keep a reader entertained. Between your wit and
your videos, I was almost moved to start my
own blog (well, almost…HaHa!) Fantastic job. I really loved what you had to say,
and more than that, how you presented it. Too cool!